


If you’re feeling the effects of long workdays on a keyboard, hours on a tennis court, or countless reps in the gym, your hands and wrists may be telling you they’ve had enough. Tightness, discomfort, and reduced grip strength are all signs of repetitive strain. Fortunately, simple at-home stretches can help ease pain, support mobility, and prevent long-term issues.
This guide shares practical stretches designed to reduce tension, improve tendon glide, and support healthy movement. These movements are part of what we use in neuromuscular rehabilitation at Keystone Body Therapies. Try them at home, and when you’re ready for a personalized approach, we’ll create a plan tailored to your body and your goals.
What Causes Hand and Wrist Pain From Overuse?
The hand and wrist are full of small joints, tendons, muscles, and nerves that all need to work together smoothly. Repeated motion or poor posture can overload these tissues, causing pain and restriction. Common causes include:
- Typing or device overuse
- Tennis, pickleball, and golf swings
- Cycling with constant handlebar grip
- Weightlifting with repetitive strain on the wrist
These activities create tension in the forearm flexors, extensors, and small hand muscles. Without proper recovery, the tissue becomes tight, leading to reduced range of motion and even nerve irritation.
Learn more from this Harvard Health article on repetitive strain injuries.

Everyday Activities That Increase Wrist and Hand Strain
Repetitive strain is not only about workouts. Common contributors include:
- Long runs with trekking poles
- Cycling with sustained grip tension
- Pickleball play with repeated swings
- Typing, texting, gaming, or mouse use
- Carrying grocery bags or gear for extended periods
Understanding the context in which your pain appears is crucial in developing a recovery plan that includes both hands on care and behavior change.
Practical Movement and Recovery Strategies
Massage and bodywork are most effective when paired with self care that improves movement quality and reduces strain throughout the day.
1. Wrist Range of Motion Drills
Circles and flexion extensions maintain mobility and reduce stiffness.
2. Tendon Glide Exercises
These help tendons slide smoothly through their sheaths.
3. Forearm Stretching
Stretching both flexor and extensor muscles reduces tension that contributes to wrist stiffness.
4. Posture and Ergonomics Awareness
Activities such as typing are easier on the body when your wrist is neutral and your shoulders are relaxed.
The Mayo Clinic offers guidance on ergonomic practices and exercises that support tendon health and reduce repetitive strain risk.
When to Seek Hands On Support
You might consider scheduling clinical bodywork when:
- Pain persists despite rest and mobility drills
- You notice loss of strength or coordination
- Symptoms interfere with workouts or daily tasks
- Pain shifts from sharp to dull, lingering discomfort
Early intervention often reduces the risk of chronic irritation and long recovery times.
How to Integrate Recovery Into Your Training
Active people often increase activity in the spring. After long runs, hikes, or playing tennis or pickleball, scheduling therapeutic care helps tissues recover so you can keep training consistently.
The Valley’s mild weather invites year round activity. When your volume increases, a plan that includes movement training, self care, and therapeutic bodywork supports your goals without the frustration of lingering pain.

Try These 5 At-Home Stretches for Wrist and Hand Pain
1. Wrist Flexor Stretch
What it helps: Loosens tight forearm flexors used in gripping, typing, and lifting.
How to do it:
- Extend one arm straight in front of you, palm facing up.
- Use the opposite hand to gently pull your fingers back toward the floor.
- Hold 20–30 seconds. Repeat 2–3 times each side.
2. Wrist Extensor Stretch
What it helps: Releases tension in forearm extensors, often overused in racquet sports or computer work.
How to do it:
- Extend one arm with the palm facing down.
- Gently pull your fingers toward the floor using your opposite hand.
- Hold 20–30 seconds. Repeat 2–3 times each side.
3. Tendon Glides
What it helps: Improves movement of tendons through the sheath to reduce stiffness.
How to do it:
- Start with your fingers extended straight.
- Make a tabletop position, then a hook fist, then a full fist.
- Move slowly through each position. Repeat 10 times.
4. Prayer Stretch
What it helps: Stretches wrist flexors and promotes forearm mobility.
How to do it:
- Place your palms together in front of your chest (like a prayer).
- Slowly lower your hands while keeping palms together until you feel a stretch.
- Hold 30 seconds. Repeat 2 times.
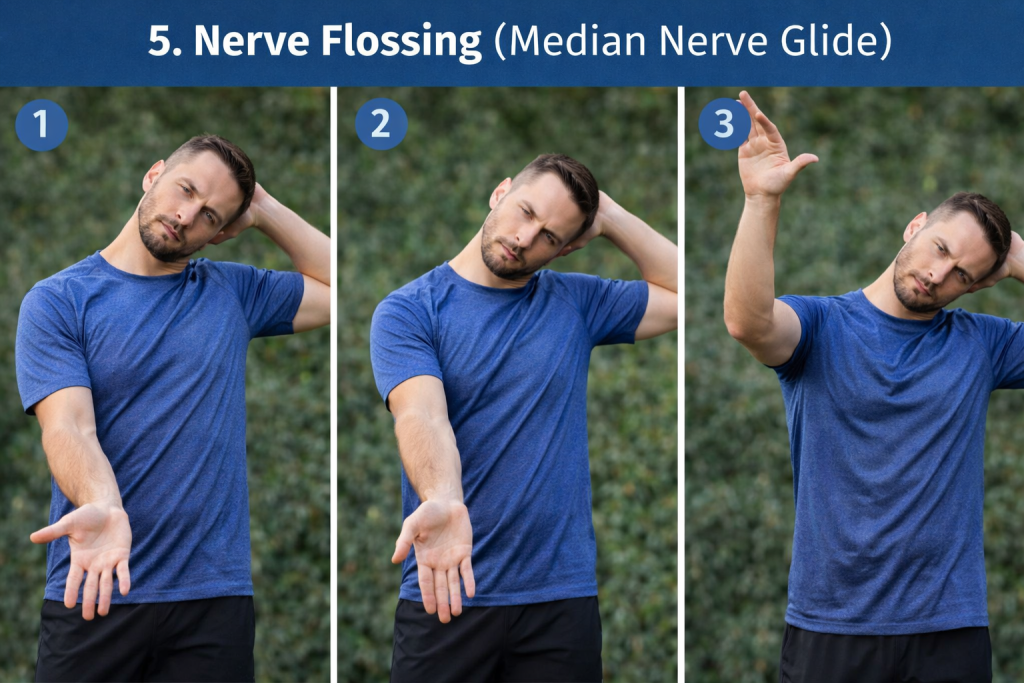
5. Nerve Flossing (Median Nerve Glide)
What it helps: Eases nerve tension contributing to carpal tunnel symptoms.
How to do it:
- Extend your arm to the side, palm up.
- Tilt your head to the opposite shoulder.
- Gently bend your wrist up and down.
- Repeat 10 slow reps on each side.
This Mayo Clinic guide offers more on carpal tunnel and related nerve issues.
When to Seek Neuromuscular Rehabilitation
While stretches can help, they don’t always address the root issue. If you’re still experiencing pain, numbness, or decreased grip strength, it may be time to come in.
Keystone’s neuromuscular rehabilitation services combine movement re-education, clinical assessment, and gentle strength work. We identify compensations and teach you how to move better — not just stretch more.
See what we offer: Keystone Services & Pricing
Try These Stretches Now — Then Come In for a Plan
Pain is often a sign that your movement needs support, not just rest. With a few daily stretches and a personalized plan, you can reduce symptoms and prevent injury.
Try these stretches now, and come in for a personalized neuromuscular rehabilitation plan at Keystone.
